Support
-
General Questions
-
PlugSearch 4
-
PlugSearch 3
-
PlugSearch 2
-
Logic Pro Presets
-
GainControl
-
Art Conductor Remote
-
Stitch
To upgrade existing products to newer versions, or to upgrade from a single product to the bundle, please log in to your account and apply the discount code that qualifies for your order. If you are unable to access your account, please contact me.
If you didn't set up an account, use the mail address used for your previous orders.
Below you will find all the discount codes and prices available. If you the code can't be applied, please check that:
- You are logged in to your account or you are using the mail address used for the previous order
- You are using the correct code, see below
UPGRADE TO PLUGSEARCH 4
From PlugSearch 2 : $25 / €25 - discount code: PL2PL4
From PlugSearch 3 or the Speakerfood Bundle V3, purchased after Jan. 1st 2024 : free - discount code: PL3PL4FREE
From PlugSearch 3 or the Speakerfood Bundle V3, purchased before Jan. 1st 2024 : $10 / €10 - discount code: PL3PL4
The short answer is yes. If you are not satisfied, a refund is no problem.
The long answer is that I will do the best I can to solve any issues you have with PlugSearch, GainControl or the Logic Pro Presets. So before you ask for a refund, please contact support.
Yes, you can install PlugSearch or GainControl on any system you personally own.
Order confirmations are sent right after payment is fulfilled. If you didn't get it, please check your spam folder first.
If you still can't find it, please contact support@speakerfood.com. I usually respond within 1 business day, 2 days at max.
First check if your computer has a valid internet connection.
If you still get a message that the license server is offline, please try again at a later time. Most of the time this is just a temporary issue. You can also try connecting to a different network, for instance a hotspot created by your mobile phone.
If you still experience issues activating, please contact me.
You can find your licenses as follows:
- Login to your account page on www.speakerfood.com. If you don't have an account, create one with the same mail address you used for your purchases.
- Click the order number for the corresponding purchase
- Under the product name, click on “Download here”
You will now see all the downloads and licenses attached to this order.
If you can't apply the discount code, please check:
- You are using the correct code. All discount codes can be found here.
- You are logged in with the account you used to purchase the product you would like to update
- If you are not logged in, check that you use the mail address you used to purchase the original product
If you still can't apply the discount, please contact me with the original order number.
I've you would like to install an older version of PlugSearch, you can remove PlugSearch from the Apps folder on your system. Download the installer of the version you would like to install from the downloads page, and install it again.
Using PlugSearch 4 is very simple.
PLUG-INS:
- Open Logic Pro
To insert a Plug-In at the first empty insert slot in the Inspector
- Open PlugSearch with the custom key command (Command-P by default)
To insert a Plug-In at a specific insert slot:
- Hoover above an Audio FX, Instrument, MIDI FX, or Articulation Set insert slot
- Hit the Quick Key, which is Control (Ctrl) by default, or the custom key command (Command-P by default)
When PlugSearch is active:
- Type to start searching
- Select a Plug-in with the cursor or arrow keys or mouse
- Double-click or hit return
To remove a Plug-in:
- Hoover above an occupied Audio FX, Instrument or MIDI FX insert slot
- Hit Command (cmd)
ARTICULATION SETTINGS:
- Open Logic Pro
- Select an Instrument track
To insert an Articulation Setting for the currently selected track:
- Open the Key Commands window of PlugSearch and assign a custom key command to 'Search Articulation Set'
- Open PlugSearch with the custom key command
To insert an Articulation Setting in the Inspector:
- Hoover above the Articulation Set insert slot in the Tracks pane of the Inspector
- Hit the Quick Key, which is Control (Ctrl) by default, or the custom key command for 'Search Articulation Set'
When PlugSearch is active:
- Type to start searching
- Select a Articulation set with the cursor or arrow keys or mouse
- Double-click or hit return
INPUTS, OUTPUTS, SENDS, SIDE CHAIN INPUTS:
- Hoover above an Input, Output, Send or Side Chain Input button
- Hit the Quick Key, which is Control (Ctrl) by default
When PlugSearch is active:
- Type to start searching
- Select a Input, Output, or Send with the cursor or arrow keys or mouse
- Double-click or hit return
TRACKS:
- Hoover above a track header in the Tracks window
- Hit the Quick Key, which is Control (Ctrl) by default
When PlugSearch is active:
- Type to start searching by track name or number
- Select a track with the cursor or arrow keys or mouse
- Double-click or hit return
PlugSearch can open as a floating, resizable window, irrespective of the location of the mouse cursor. Instead of using the modifier key for 'Search' (Control by default), use the custom key command instead (Command-P by default).
The Quick Load window will open. Selecting a Plug-In by pressing enter or double-clicking will insert it on the first available insert slot in the Inspector. If an Instrument is selected and the currently selected track is an Audio track, an Instrument track will be automatically created with the Instrument.
You can also drag & drop a Plug-In to any insert slot in Logic Pro, or to the Track header.
To trigger Plug-Ins by any MIDI application or device, you use the Control Grids window.
- Open the Control Grids window from the PlugSearch drop down menu in the Finder task bar. You can also assign a key command to 'Open Control Grids Window'
- Select the MIDI device in the MIDI input drop down menu
- Click the 'plus' button in the bottom left to create a new grid
- Name the Grid, and assign a MIDI CC Number and MIDI Channel
- You can now drag Plug-Ins from the Plug-Ins table to the grid (you can drag multiple Plug-Ins at the same time)
The item number in the Control Grid corresponds to the MIDI CC value. For instance, if you created a grid that is assigned to MIDI CC 1, Channel 1, then use this MIDI message to trigger the Plug-In in item number 1:
CC 1, Channel 1, Value 1
To change the order of items in the grid, you can select and move Plug-Ins to a different slot.
TRIGGER
If you enable the 'TRIGGER' button, you can trigger Plug-Ins directly from the Control Grids window. Plug-Ins will be inserted at the first available insert slot of the selected track in Logic Pro.
IMPORT / EXPORT
You can export and import Control Grids if you want to use them on another system, or for backup purposes
PLUGSEARCH 3 FAVOURITES
Triggering favourites by MIDI CC is no longer supported in version 4, the Control Grids replaces this functionality. If you defined favourites in PlugSearch 3, these will be converted to Control Grids on first launch of PlugSearch 4.
You can assign keyboard shortcuts to Plug-Ins to have them inserted in the first available insert slot in the Inspector instantly.
Open the Plug-Ins window from the drop down menu of PlugSearch in the Finder task bar. Select a Plug-In and press the 'Learn' button, and press a keyboard shortcut. The shortcut is now assigned to the Plug-In. If the shortcut was assigned to another Plug-In, it will be removed from that Plug-In.
Note: these shortcuts override any Logic Pro keyboard shortcuts, so make sure they don't overlap any Logic Pro shortcut you are using.
The shortcuts are stored in the preferences of PlugSearch. If you would like to transfer these to another system, copy this file:
~/Library/Preferences/com.speakerfood.PlugSearch
First, open the Plug-ins window from the PlugSearch drop down menu in the Finder task bar. Then you can drag-and-drop Plug-ins from the list to each corresponding Favourites box. Here you can also reorder the favourites.
You can also mark Plug-Ins as favourite by clicking the yellow star button right of each Plug-In in the search results, or in the Plug-In Info Panel, which you can open by pressing the right arrow key.
To have PlugSearch automatically hide UAD Plug-Ins that are not licensed, follow these steps:
- Open the 'Plug-Ins' window from the PlugSearch menu
- Click the action menu in the top right, and choose 'Set UAD Visibility'
You will now be guided through the steps, and PlugSearch will hide UAD Plug-Ins that are not licensed.
PlugSearch runs as a background application in the Finder's task bar. You can find its icon in the top right (a magnifying glass). Click the icon and select 'Quit' from the drop-down menu.
If PlugSearch can't find your Plug-Ins in its online database, it will not categorise them. The database is continuously updated, and PlugSearch will automatically update the categorisation daily.
If you want to change or assign categories manually, open the Plug-Ins window of PlugSearch. You can now select one or more Plug-Ins and change the categories in the right panel.
To use Elegato Stream Deck to insert Plug-Ins in Logic Pro, please follow these steps:
- Configure as many Control Grids as you need, following these instructions
- Open Audio/MIDI Configuration on your system, and check the name of the IAC device and make sure it is active. You can check if it is active by double clicking its icon in the MIDI-studio window
- For Stream Deck, install the Stream Deck MIDI plug-in if you haven't done so already
- In the Stream Deck editor, create a MIDI Button, and configure it like the image below, with the following notes:
- The 'Command' value should match the CC value of the Control Grid
- The 'Channel' value should match the Channel value of the Control Grid
- The 'Value' should match the number in the Control Grid that contains the Plug-In
Set the MIDI Out port to the IAC device.![]()
- In the Control Grids window of PlugSearch, select 'Bus 1' as the MIDI input port.

When Logic Pro is active, you should now be able to trigger Plug-Ins with your Stream Deck.
PlugSearch is compatible with:
- macOS High Sierra (10.13) or higher
- Logic Pro version 10.4.8 or higher
PlugSearch is not compatible with Sierra (10.12). If you have a valid license, you can still use PlugSearch 2. You can download version 2 here:
To install PlugSearch:
- Double click the .zip file
- Open the .pkg file
- If you get a warning, open System Preferences -> Security and allow the installer to open
- Follow the setup procedure
Note: if you get a message that the installer is corrupted, this means that there was an error unpacking the .zip file. Please use another unzip application and try again.
The installer will create the following files and folders:
- The 'PlugSearch' application in the Apps folder
- The folder ~/Library/Application Support/PlugSearch
- The preference file ~/Library/Preferences/com.speakerfood.PlugSearch
PlugSearch is installed in your applications folder as a standalone application. When you open it, it will run as a background process in the Finder's task bar. You can see its icon (diamond shaped wave) there.
Support files for PlugSearch are stored at ~/Application Support/PlugSearch
A preference file is also created at ~/Library/Preferences/com.speakerfood.PlugSearch
To uninstall PlugSearch, follow these steps:
- Quit PlugSearch
- Delete the following files and folders:
- Applications/PlugSearch
- ~/Library/Application Support/PlugSearch
And, if present:
- ~/Preferences/com.speakerfood.PlugSearch.plist
Warning: resetting PlugSearch will delete any shortcuts assigned to Plug-Ins. Please backup the file ~/Library/Preferences/com.speakerfood.PlugSearch first.
- Quit PlugSearch
- Backup and delete the folder ~/Library/Application Support/PlugSearch
- Open a terminal and type: defaults delete com.speakerfood.PlugSearch
- Open PlugSearch
- Enter your license key again
Yes, you can. The PlugSearch category is only needed for stock Logic Pro Plug-ins, but you can use as many custom categories as you want. PlugSearch will list these with a 'User' icon.
You can find installers of legacy versions on the Downloads page.
You can find the release notes of PlugSearch here.
If PlugSearch can't find a Plug-In in Logic Pro's Plug-In menu, check that:
- The Plug-In is available in the channel mode of the insert slot
- The Plug-In is not deactivated in Logic's Plug-In Manager. If it is, you can open PlugSearch's Plug-Ins window and hide the Plug-In from the results
- The Plug-In is unavailable in Logic because it didn't pass Audio Unit validation. You can check this in Logic's Plug-In Manager
- If the Plug-In has a custom name with a colon character (:), Logic Pro will create an extra folder in the Plug-In menu. Please remove the colon character.
First, do not Control-click or Command-click, just press Control or use the custom key command (Command-P by default).
If PlugSearch still does not appear when you press control or option on an empty insert slot, please follow these steps:
- Check if you have the latest version of PlugSearch installed. Update notifications are automatically sent.
- Make sure your are running Logic Pro version 10.5 or up and it is installed in the Applications folder (not in any sub folder)
- Make sure PlugSearch is running. It's icon should be visible in the top right of the system menu-bar. PlugSearch is a standalone application, not a Plug-in.
- Check that PlugSearch is not Paused
- Remove PlugSearch from the Accessibility list in the System Preferences, restart your computer, and open PlugSearch again.
- Control and Command don't work when you are working with Remote Desktop. You can use a custom key-command instead.
- If you updated from a previous version of PlugSearch, try deleting the preferences: Quit PlugSearch, open Terminal and type: defaults delete com.speakerfood.PlugSearch
PlugSearch scans available Plug-ins on your system when it opens.
If you installed or removed Plug-ins, you can force a rescan in the Preferences of PlugSearch, or from the rescan button in the PlugSearch window.
Note that some Plug-Ins are only registered by MacOS after a restart, even if they are recognised by Logic Pro. So if you see the Plug-In in Logic Pro, but not in PlugSearch, please perform a restart.
Note: if you moved or renamed the following folder:
/Library/Audio/Plug-Ins/Components,
your system will not have a correct registry of your installed components. A restart will fix this.
Just press control or command, don't control-click or command-click. This was a feature in an earlier version of PlugSearch.
PlugSearch's automatic categorisation will not work for Plug-ins you categorised with Auganiser, as Auganiser changes the manufacturer name in the Plug-In component file on your system.
To force a rescan of custom Plug-In names, you can use the Rescan button in the PlugSearch window (the spiralling arrow) or in the Preferences of PlugSearch.
To have PlugSearch respond to key commands triggered by MetaGrid, set the 'Target Application for Macros' to 'Desktop'.
PlugSearch 4 can crash frequently when an RME ARC remote control is connected to an USB port of your system with an outdated firmware version. The issue can be solved by updating the RME ARC to the latest firmware version.
For MacOS versions earlier than Sonoma, Logic Pro can crash when you remove a Plug-In with PlugSearch. Apple is aware of this issue and are working an a fix. The problem only occurs on specific system configurations. The workaround at the moment is to disable the key command for removing Plug-Ins until this has been fixed by Apple.
Using PlugSearch is very simple.
PLUG-INS:
- Open Logic Pro
To insert a Plug-In at the first empty insert slot in the Inspector
- Open PlugSearch with the custom key command (Command-P by default)
To insert a Plug-In at a specific insert slot:
- Hoover above an Audio FX, Instrument, MIDI FX, or Articulation Set insert slot
- Hit Control (Ctrl) or the custom key command (Command-P by default)
When PlugSearch is active:
- Type to start searching
- Select a Plug-in with the cursor or arrow keys
- Double-click or hit return
To remove a Plug-in:
- Hoover above an occupied Audio FX, Instrument or MIDI FX insert slot
- Hit Command (cmd)
ARTICULATION SETTINGS:
- Open Logic Pro
- Select an Instrument track
To insert an Articulation Setting for the currently selected track:
- Open the Key Commands window of PlugSearch and assign a custom key command to 'Search Articulation Set'
- Open PlugSearch with the custom key command
To insert an Articulation Setting in the Inspector:
- Hoover above the Articulation Set insert slot in the Tracks pane of the Inspector
- Hit Control (Ctrl) or the custom key command for 'Search Articulation Set'
When PlugSearch is active:
- Type to start searching
- Select a Articulation set with the cursor or arrow keys
- Double-click or hit return
You can use any device that sends CC (Control Change) MIDI messages to insert a favourite Plug-In on the first available insert slot in the Inspector.
First, define favourites in the PlugSearch Plug-In window by dragging them from the Plug-In table to the Favourites boxes.
Second, in PlugSearch Preferences, set the CC number that you would like to use. Default is 110, as this is reserved as unused in the standard MIDI specification.
The MIDI channel you use determines the Plug-In type:
- Channel 1 : Audio FX
- Channel 2 : Instruments
- Channel 3 : MIDI-FX
The value of the CC corresponds to the favourite number. So for example:
CC110, value 1, channel 1 : insert Audio-FX favourite 1
CC110, value 2, channel 1: insert Audio-FX favourite 2
CC110, value 1, channel 2: insert Instrument favourite 1
etc.
Using PlugSearch is very simple.
To insert a Plug-in:
- Open Logic Pro
- Hoover above an empty Audio FX, Instrument or MIDI FX insert slot
- Hit Control (Ctrl)
- Type to start searching
- Select a Plug-in with the mouse or arrow keys
- Double-click or hit return
To remove a Plug-in:
- Hoover above an occupied Audio FX, Instrument or MIDI FX insert slot
- Hit Control (Ctrl)
Hit Command or the alternative key command to insert:
- a mono to stereo Audio FX on a mono insert slot
- a double-mono Audio FX on a stereo insert slot
- a mono or multi-output Instrument (depending on availability)
Simply start the first search word with a capital. For instance: "Wa" will list all Plug-ins made by Waves and other manufacturers who's name contains "Wa".
You can refine your search by adding words without capitals, to search for Plug-ins by name. For instance, use "Wav lim" to quickly list Plug-ins by Waves that contain the string "lim" in their name.
Yes. Type "?" and hit enter. PlugSearch will enter a random Plug-in. Great way to create randomness in your production.
Yes.
Open the preferences to set custom key commands for PlugSearch. A custom key command has to be a combination of modifier key and alphanumeric key, for instance command-P. Single characters are not allowed as they interfere when typing regular text in Logic Pro.
Open the PlugSearch Plug-in Database to see all detected Plug-ins on your system. It also shows information on how many times a Plug-in was inserted by PlugSearch, how many Plug-ins were scanned, and which custom name a Plug-in has in Logic Pro.
The following actions are available:
- Visibility: option to show/hide Plug-ins in the search results
- Import or export these settings
Open the PlugSearch Plug-in Database. Here you can select which Plug-ins you want to hide in the search results.
For instance, the Universal Audio update installer always installs all Plug-ins on your system, even the ones you don't own. In PlugSearch, the visibility of these Plug-ins is permanent, so you can hide the ones you don't own, and this setting will remain even after the update.
By default, the search results are ordered by 'last time used'. You can reset this order in the Plug-in Database action menu.
The latest version of PlugSearch 2 can be downloaded here:
Owners of PlugSearch 2 are advised to upgrade to version 3, as it has many new features. Also version 3 is compatible with Apple Silicon systems. Log in to your account (or create one with the mail address you used to order version 2), and use the code PLUGSEARCHUPGRADE at checkout. The upgrade price is $10.
To install PlugSearch:
- Open the .pkg file
- If you get a warning, open System Preferences -> Security and allow the installer to open
- After installation, open PlugSearch from the Applications folder
On opening for the first time, PlugSearch will ask for Accessibility privileges
- Go to System Preferences -> Security & Privacy -> Privacy
- Click on Accessibility in the left column
- Unlock
- Find PlugSearch in the right column and enable access
LOGIC PLUGIN MANAGER SETUP
Follow these steps:
- In Logic Pro X, open Preferences -> Plug-in Manager
- Create a new category by clicking the plus sign to the right of the label Category
- Name the new category “PlugSearch”
- Click "Logic" in the bottom left panel
- Select all Logic Plug-ins and drag them to the category PlugSearch
PlugSearch is installed in your applications folder as a standalone application. When you open it, it will run as a background process in the Finder's task bar. You can see its icon (a magnifying glass) there.
The Plug-in library is stored at ~/Application Support/PlugSearch
A preference file is also created at ~/Library/Preferences/com.speakerfood.PlugSearch
Yes it is, but you need to follow these additional steps after installation.
- Download the BTT preset for PlugSearch
- Unzip the file
- Double click the BTT preset file. This wil import the preset in BTT.
- In the preferences of PlugSearch, enable 'Automatically Enable/Disable BetterTouchTool
Each time PlugSearch triggers event to the system, BTT is temporarily disabled with the key command 'command-ctrl-shift-P'. Don't use this key command for other actions.
To uninstall PlugSearch, remove the following files and folders:
- /Applications/PlugSearch
- ~/Library/Application Support/PlugSearch
And, if present:
- ~/Library/LaunchAgents/com.speakerfood.plugsearch.user.agent.plist
- ~/Preferences/com.speakerfood.PlugSearch.plist
In Logic Pro, you can safely remove the custom category 'PlugSearch'. It won't affect the installation of your Plug-ins, or other categories you may have defined.
Yes you can, you can install PlugSearch on any system you personally own. There's no online hardware ID check, just me trusting you to handle this license with care.
PlugSearch runs as a background application in the Finder's task bar. You can find it's icon in the top right (a magnifying glass). Click the icon and select 'quit' from the dropdown menu.
Yes.By default PlugSearch starts when you login. You can change this in the PlugSearch Preferences, which you can open from the top menu bar icon.
PlugSearch is compatible with:
- macOS High Sierra, Mojave, Catalina and Big Sur
- Logic Pro X 10.4.5 and up
- Chinese and Japanese languages are not supported
Follow these steps if you are running BetterTouchTool:
- Download the BTT preset for PlugSearch
- Unzip the file
- Double click the BTT preset file. This wil import the preset in BTT.
- In the preferences of PlugSearch, enable 'Automatically Enable/Disable BetterTouchTool
Each time PlugSearch triggers event to the system, BTT is temporarily disabled with the key command 'command-ctrl-shift-P'. Don't use this key command for other actions.
Do not Control-click or Command-click, just press Control or Command.
If PlugSearch still does not appear when you press control or option on an empty insert slot, please follow these steps:
- Check if you have the latest version of PlugSearch installed. Update notifications are automatically sent.
- Make sure your are running Logic Pro X 10.4.5 or up
- Make sure PlugSearch is running. It's icon should be visible in the top right of the system menu-bar. PlugSearch is a standalone application, not a Plug-in.
- If you run Logic in German, Spanish or French, make sure that in the System Preferences this language is the first language. Quit and restart PlugSearch and Logic Pro X.
- If your system language is not English, German, Spanish or French, make sure the second language is set to English so Logic runs in English. Quit and restart PlugSearch and Logic Pro to detect the correct language.
- Remove PlugSearch from the Accessibility list in the System Preferences, restart your computer, and open PlugSearch again.
Please note: Chinese and Japanese is not yet supported.
If PlugSearch does not insert the correct Plug-in, please check the following:
- WAVES PLUGINS
If you are using Waves Plug-ins, you'll find a mono (m) and stereo (s) version for every Plug-in. Make sure to select a (m) Plug-in for mono insert slots and a (s) Plug-in for stereo insert slots, otherwise PlugSearch won't find the correct Plug-in.
- OTHER MACRO APPLICATIONS
If other macro applications are running that respond to 'single key' key commands, for instance GainControl, Keyboard Maestro, BetterTouchTool, replace these with key commands that contain key modifiers. So don't use single keys like 'a', 'p', etc. anywhere.
- CUSTOM KEY COMMAND
Only use key combinations as custom key command, not single keys.
- PLUGSEARCH CATEGORY
Make sure you set up the PlugSearch category as described below in Logic's Plug-in Manager. It must be named "PlugSearch" (no spaces). Put all Logic's native Plug-ins in this category, not 3rd-party ones.
- BETTERTOUCHTOOL
BetterTouchTool is a macro application that can interfere with PlugSearch. If you are running BetterTouchTool, follow the instructions below. If you are not running BetterTouchTool, make sure you uncheck the option 'Automatically Disable/Enable BetterTouchTool' in PlugSearch's Preferences window. - LANGUAGE
Make sure Logic's language is detected correctly, by setting English, German, Spanish or French as your first system language, or otherwise English as the second system language. Quit and restart PlugSearch to detect the system language. - DISABLED PLUGINS
If you try to insert a Plug-in that you have disabled in Logic's Plug-in Manager or which couldn't be validated by Logic, PlugSearch will not find the Plug-in and inserts the closest match. - CUSTOM COLOURS / IMAGES
If Logic Pro was modified to have custom colours and images for the user interface, PlugSearch might not work properly.
Make sure you only press control or command, and don't control-click or command-click. The mouse click was needed in earlier versions of PlugSearch, and you will see it in YouTube tutorials. Since version 2, you only have to press control or command.
When you have different versions of PlugSearch on your system, check if only one instance of PlugSearch is running in the Finder's task bar. If two instances are running, check if PlugSearch was added to the start-up items in the System Preferences and remove it.
If PlugSearch triggers random actions instead of inserting a Plug-in, you probably have the option 'Automatically Disable/Enable BetterTouchTool' enabled in the PlugSearch preferences. If you are not using BetterTouchTool, uncheck this option.
If the problem persists, reset the PlugSearch preferences:
- Quit PlugSearch
- Open a terminal and execute: defaults delete com.speakerfood.PlugSearch
- Start PlugSearch
- Enter your license key to activate PlugSearch
- Quit PlugSearch
- Remove the folder ~/Library/Application Support/PlugSearch
- Open a terminal and type: defaults delete com.speakerfood.PlugSearch
- Open PlugSearch
- Enter your license key
If you have trouble activating PlugSearch, you can reset the preferences:
• Quit PlugSearch
• Open a terminal and type: defaults delete com.speakerfood.PlugSearch
• Delete the directory ~/Library/Application Support/PlugSearch
• Open PlugSearch
The presets are all installed in the folder /Library/Audio/Presets, in the following folders:
- FabFilter
- UAD
- Waves
- SoundToys
- To use these presets you need to have Logic Pro X or 9 installed, as well as the corresponding plugin(s).
- OSX version 10.6 - 11.2
- 692 MB of free space
Yes. Custom presets are saved at user level, at:
~/Library/Audio/Presets
The Logic Pro Presets are installed at system level, at:
System/Library/Audio/Presets
You can create and delete your own custom presets without affecting the installed presets, and Logic's Library window will show all the presets it finds at system and user level.
Yes, you can. The installer allows you to install only the bundles you use. And if you want to clean up some more disk space you can delete the preset folders of the plugins you don't own.
You get all the factory presets in native Logic Pro format from:
- Waves Mercury
- UAD Powered Plugins
- SoundToys
- FabFilter Total Bundle
UADx (Spark) presets are not included in the bundle.
Important: You don't buy the plugins themselves, you have to own these to use the plugin presets.
If you can't see the presets in Logic's Library window, make sure the blue triangle is pointing at the right Plug-in slot in the inspector or Mixer window. See screenshot below:

Otherwise, you can check if they are installed correctly from the top drop down menu in the Plug-in window. See screenshot below.
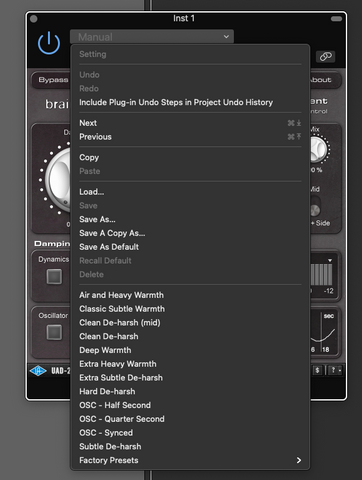
Unlike the Powered Plug-Ins, the Spark Plug-Ins have an excellent preset browser, which works with tags and favourites.
- Double click the .pkg file
- Go to the Applications folder and open GainControl
The first time you use GainControl, it will ask permission to control System Events.
- Click 'OK'
- Click 'Open System Preferences'
- Unlock to make changes
- Enable the checkbox next to GainControl
If for some reason GainControl does not ask for Accessibility permissions, you can add it manually:
- Open System Preferences -> Security & Privacy
- Go to the tab 'Privacy'
- Select 'Accessibility' from the list
- Unlock to make changes
- Click the plus sign and add GainControl from the Applications folder

When you use GainControl for the first time in Logic Pro, it will ask permission to operate on Logic.
- From the Finder task bar GainControl icon, open the GainControl Preferences
- Enter the license you received and click Activate
Yes you can, you can install GainControl on any system you personally own. There's no online hardware ID check, just me trusting you to handle this license with care.
By default, GainControl starts when you login. You can change this in the GainControl Preferences, which you can open from the Finder task bar icon.
GainControl runs as a background Finder task bar application. You can find it's icon in the top right Finder task bar. From there, you can quit GainControl.
To uninstall GainControl:
- remove GainControl from the Applications folder
- open a terminal and type: defaults delete com.speakerfood.GainControl
GainControl allows you to change the gain and fades of audio regions in Logic Pro. You can set the key commands in the GainControl Preferences window.
Here is how you use GainControl:
- In Logic Pro, make sure that the Inspector is open (in the sidebar or floating)
- Select an audio region
- Use the GainControl key commands to change the gain or apply/remove fades
The gain can be changed by 'small' or 'normal' amounts. The fade length can be increased or decreased by a fixed amount, that can be set to a custom value.
If GainControl does not change the region gain or fades, check that it's actually running, it's icon should be visible in the Finder task bar.
Under some circumstances, the Accessibility privileges may get corrupted. In that case, remove GainControl from the Accessibility list under System Preferences -> Security & Privacy -> Privacy. Restart your system and open GainControl, it will ask for permission to be added again.
To setup PlugSearch for Art Conductor Remote, follow these steps:
• Download and install the latest version of PlugSearch
To have Logic Pro listen to articulation switches send by PlugSearch, open Logic Pro and go to Settings -> General -> MIDI. Confirm that the settings are set as follows:

Also, make sure that PlugSearch is enabled as MIDI input in Logic Pro -> Settings -> MIDI -> Inputs:

To test the connection between PlugSearch and Logic Pro / MetaGrid Pro, open PlugSearch -> Preferences -> Art Conductor. Use the two test buttons and follow the instructions.
Also confirm that the path to the Art Conductor Logic folder matches the path on your system.

To setup MetaGrid Pro for Art Conductor Remote, follow the instructions in the following tutorial:
MetaGrid Pro setup for Art Conductor Remote
The Art Conductor object in MetaGrid Pro will list the articulations of the Art Conductor articulation set of the selected track in Logic Pro.
Walkthrough:
https://www.youtube.com/watch?v=UEwsORcOx2w
In Logic Pro, select an Instrument track and in the Inspector, load an Art Conductor articulation set. The Art Conductor object in MetaGrid Pro now shows all the articulations of that set. If not, you can set a key command to 'Update Metagrid', and use that on a selected track in Logic Pro.
You can now use the Art Conductor object to:
- Select an articulation
- In the Piano Roll / Score window you can change the articulation of selected notes
If you change the articulation in Logic Pro from the pop-up button in the Piano Roll or Score window, the Art Conductor object will update the selected articulation.
Articulation sets are stored within a Logic Pro project, so if you install a newer version of Art Conductor, you need to replace these with the new versions.
- In PlugSearch -> Key Commands, assign a key command to 'Update Articulation Set'
- In Logic Pro, hoover over the articulation set name in the Inspector, and press the key command for 'Update Articulation Set'. You can also use the 'update' button in the search window for Articulation Sets. PlugSearch will ask if you would like to replace the current articulation set with the one located in the Art Conductor folder
You can create your own articulation sets, or modify Art Conductor sets, and the articulations will show up in MetaGrid Pro, with the following taken into consideration:
- When you create a custom articulation set and save it, it might take a few seconds before it is scanned by PlugSearch. If you would like to see the scanning progress, open the Articulations window in PlugSearch
- Use unique names for custom articulation sets. If you use duplicate names, PlugSearch might send the wrong data to MetaGrid, as it can't differentiate between identical named sets
- Save the custom sets in a folder in ~/Library/Audio/Audio Music Apps/Articulation Settings. Don't save them within the Art Conductor folder
- Use only Note On and Poly Pressure switches in the articulation set
- Custom articulation sets will be shown in MetaGrid Pro without categories
- It's highly recommended to use Art Conductor for Logic, with over 10.000 of articulation sets it covers most if not all of your virtual instruments, and it will show the articulations categorised in MetaGrid Pro
Important: the latest version of Metagrid Pro has an issue where large articulation sets won't be displayed when Logic Pro is running under MacOS Sequoia. MetaSystems is aware of this issue and are fixing this as soon as possible.
If the Art Conductor object in MetaGrid is not showing the articulations of the currently selected track in Logic Pro, follow these steps:
• Confirm that PlugSearch has been configured for Art Conductor Remote
• Make sure you are running MetaServer 3.4.4 or higher
• If the iPad is connected by USB, try switching to Wifi or vice versa
• In MetaServer -> Setup -> Network, disable 'USB connection only'
• Ensure you are using MetaGrid Pro, and have the Art Conductor object set up
• An Art Conductor articulation set is loaded for the Instrument track in Logic Pro
• The 'Track' panel in the Inspector is visible
• If only the manufacturer and library is displayed, confirm that PlugSearch has imported the Art Conductor database correctly
With the latest version of PlugSearch, the PlugSearch Control Surface not required any more. You can download the latest version here.
If PlugSearch can't find all the articulations in ~/Music/Audio Music Apps/Articulation Settings, check the following:
• The folder ~/Music/Audio Music Apps/Articulation Settings has read permissions for the primary user
• The folder doesn't contain aliases or symbolic links
• Custom or modified Art Conductor articulation sets are not placed within the Art Conductor folder
You can force a full rescan of the Articulation Settings folder. Open the 'Articulation Sets' window, and click the 'Rescan' button
If the articulation of notes in the Piano Roll or Score window is not changing when you switch an articulation in MetaGrid Pro, make sure that the local inspector in the Piano Roll or Score window is visible. You can make the local inspector visible from the 'View' menu in the top left of each window.
The local inspector shows the articulation setting, which PlugSearch operates on to edit the articulation of selected notes.
If MetaGrid Pro doesn’t show the articulation switches of Art Conductor sets, it means that the Art Conductor database hasn’t been imported correctly. Please follow these steps:
• Install the latest version of Art Conductor for Logic
• Check that Art Conductor for Logic is installed as follows:

• Perform a full rescan of the Articulations Settings folder, by clicking the rescan button in PlugSearch -> Articulation Sets
If Logic Pro does not follow the articulation selection in MetaGrid Pro, follow these steps:
• Confirm that the Instrument is set up correctly for Art Conductor
• Make sure the latest version of MetaServer is installed
• Quit and restart MetaServer
• Confirm that PlugSearch is set up for Art Conductor Remote
• If the iPad is connected by USB, try switching to Wifi or vice versa
This can occur when you place the manufacturer folders of Art Conductor at the root level of ~/Music/Audio Music Apps/Articulation Settings. Instead, keep the default folder structure intact:
~/Music/Audio Music Apps/Articulation Settings/?️ Art Conductor Logic/
This has been fixed in the latest version of PlugSearch which you can download here.
If the articulation set names in the PlugSearch search window are not correct, follow these steps:
• Open PlugSearch -> Preferences -> Appearance
• Disable 'Hide Art Conductor set code'
If you get warning windows that don't seem to be correct, you might need to add PlugSearch to the Accessibility list in the System Preferences again:
- Quit PlugSearch
- Open System Preferences -> Security & Privacy -> Privacy, and remove PlugSearch from the Accessibility list
- Restart your system
- Open PlugSearch, and add it to the Accessibility list again
Also, make sure that Logic Pro is located in the Applications folder and not in any sub-folder, and you are running a legal version.
If you still get the warning, please contact support.
Certain libraries require additional setup for Art Conductor. Please check the Art Conductor support page for additional information.
Also, any selected articulation in Metagrid Pro will not become active in Logic Pro untill a note is received.
For multi-timbral Insruments, MetaGrid Pro will not update the articulations when you select a track by default.
To fix this, click the title of the track in the Inspector -> Tracks pane. Change that name to whatever you like, just make sure it is different for each track. This will trigger PlugSearch to update MetaGrid Pro. This will only work if you change the name in the Inspector, changing it in the track header will not work.
If the Art Conductor object in MetaGrid is showing only the basic layout, this means that PlugSearch has imported the Art Conductor articulations as ‘custom user’ articulations. This occurs when the path to the Art Conductor folder is not matching the path in the Preferences of PlugSearch.
You can check the path to the Art Conductor folder in the Art Conductor preferences of PlugSearch, see image below.

Also, check that the ‘Art Conductor.artcon’ file is located in the Art Conductor folder, see image below. If it is not, you need to update Art Conductor to at least version 9.

If PlugSearch is not rescanning the Art Conductor database automatically, you can force a rescan from the Articulation Sets window. If the Art Conductor database was imported correctly, the Art Conductor sets should have the Babylonwaves logo in the Articulation Sets window of PlugSearch, see image below.

The .artcon file is the database that comes with Art Conductor 9 and later, and is required for the integration between PlugSearch and MetaGrid.
If you are not using MetaGrid, disable 'Connect to MetaGrid Pro' in the preferences of PlugSearch, and PlugSearch will not show the warning. If you are using MetaGrid for articulation selection, make sure the .artcon file is located inside the '?️ Art Conductor Logic' folder.
To launch Stitch from the finder, select a compatible video and audio file. With both files selected, right-click on one of the files and select 'Open with' -> 'Stitch'. Stitch will replace the audio in the video with the selected audio file, and create a new file on the same location as the original video file.
You can open Stitch by double-clicking it in the Apps folder. To add a video and audio file, do one of the following:
- Select 'Open...' from the File menu, and select a video and audio file
- Drag and drop a video and audio file from the finder on the Stitch window
- Click the 'Add video...' and 'Add audio...' button
When a compatible video and audio file is loaded, you can press the 'Stitch' button, to replace the video audio with the selected audio file. A new video file will be created on the same location as the original video file, and Stitch will show it in the Finder.
Install stitch by unpacking the downloaded .zip file. Then double-click the installer and run it. Stitch will be installed in your Apps folder.
To uninstall Stitch, move the following files to the trash:
- 'Stitch' in the Apps folder
- the file ~/Library/Preferences/com.speakerfood.Stitch (if present)
Not all video and audio formats are compatible. Stitch will show a warning when this is the case. Try converting the video or audio file first, to make them compatible with each other. The .mov video format is compatible with all supported audio formats.